Difference between revisions of "OCS Inventory"
Unnilennium (talk | contribs) |
Unnilennium (talk | contribs) |
||
| Line 43: | Line 43: | ||
# InventoryDelay | >1 | 600 | Time to wait (sec) to avoid server overload (Agent cron) | # InventoryDelay | >1 | 600 | Time to wait (sec) to avoid server overload (Agent cron) | ||
# URL | new alias | | Optionnal aliases for ocs and glpi web interfaces | # URL | new alias | | Optionnal aliases for ocs and glpi web interfaces | ||
| + | |||
| + | |||
| + | =Client Installation= | ||
| + | |||
| + | The client side is available [http://www.ocsinventory-ng.org/index.php?page=1-01 on all platforms]. Download the latest client version according to your OS. | ||
| + | |||
| + | After installing the Agent, you should launch it manually to upload your first inventory (as it's updated once per day by default) | ||
| + | |||
| + | While you are installing the agent, copy the cacert.pem file, see the SSL section below. | ||
| + | |||
| + | ==OCS Agent for SME Server== | ||
| + | |||
| + | If you want to inventory other SME Servers (without installing the server-side and web interfaces) | ||
| + | |||
| + | yum install ocsinventory-agent ocsinventory-ipdiscover --enablerepo=smetest,epel | ||
| + | |||
| + | Then edit ''/etc/ocsinventory-agent/ocsinv.conf'' and modify following lines: | ||
| + | OCSSERVER=yourdomain.com | ||
| + | OCSTAG=your_tag | ||
| + | And finally launch the first inventory manually: | ||
| + | ocsinventory-agent -s yourdomain.com -t your_tag | ||
| + | |||
| + | ==OCS Agent for Windows== | ||
| + | There are 2 differents ways of sending inventories on Windows. Download the latest client software, OCSNG_WIN32_AGENT_1.xx_repack.zip from ocs website. This archive contains 3 executables. | ||
| + | |||
| + | See Section 4.1 in the internal OCS help file. | ||
| + | ===Service use=== | ||
| + | Using OCS as a service is what you will probably need. | ||
| + | |||
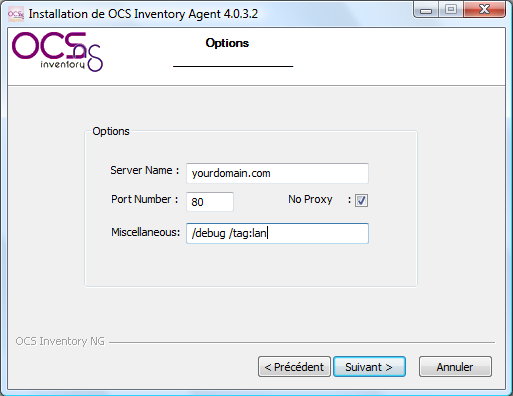
| + | Launch the install of ''OcsAgentSetup.exe'' and provide default settings of the service. | ||
| + | [[Image:OCS-winagent-setup.png]]<br> | ||
| + | ---- | ||
| + | Then launch the first inventory by typing the following in the 'execute box': | ||
| + | "C:\Program Files\OCS Inventory Agent\OCSInventory.exe" /server:yourdomain.com /np /debug /tag:your_tag | ||
| + | Wait a few seconds and go to http://your-server/ocs, you should see your computer's inventory. | ||
| + | |||
| + | By default, Agent will contact the Server once a day. | ||
| + | |||
| + | You can override this default behaviour in ocs web interface options. Your changes will be applied next time the Agent contacts the Server. | ||
| + | ---- | ||
| + | For troubleshooting, look at the log file in ''C:\Program Files\OCS Inventory Agent\COMPUTER_NAME.log'' | ||
| + | |||
| + | |||
| + | ===Standalone use=== | ||
| + | You can also make inventories on Windows without installing the service. | ||
| + | |||
| + | OCS standalone client is cut into 2 executables: | ||
| + | *''ocsagent.exe'' - This file contains all needed files for the launcher | ||
| + | *''OcsLogon.exe'' - This file is the standalone executable (launcher) | ||
| + | |||
| + | Of course, ''ocsagent.exe'' must be uncompressed before launching the standalone executable. | ||
| + | |||
| + | This can be done by executing directly ''ocsagent.exe'': files will uncompress in ''c:\ocs-ng''. | ||
| + | |||
| + | You can also import this file into ocs' MySQL database so that the standalone executable can download it if needed. This is documented in [http://wiki.contribs.org/index.php?title=OCS_Inventory_Tools&action=submit#MySQL_importation section MySQL importation]. | ||
| + | |||
| + | The command line is the same as for the service: | ||
| + | "C:\Path_to_file\OcsLogon.exe" /server:yourdomain.com /np /debug /tag:your_tag | ||
| + | For easier and faster inventorying, you can also rename this standalone executable to your domain name (don't forget ''.exe''): | ||
| + | "C:\Path_to_file\yourdomain.com'''.exe'''" /np /debug /tag:your_tag | ||
| + | |||
| + | For troubleshooting, look at the log file in ''C:\ocs-ng\COMPUTER_NAME.log'' | ||
| + | ---- | ||
| + | |||
| + | |||
| + | ===Importing ''ocsagent.exe'' in MySQL=== | ||
| + | The main advantage of this method is that you can send the standalone executable by Internet very quickly or even put the standalone executable on a floppy disk as it's only 65KB! How powerful looks your old floppy disk drive now? | ||
| + | |||
| + | This also allows to update files archived in ''ocsagent.exe'' on your clients (can be service or standalone executable). | ||
| + | |||
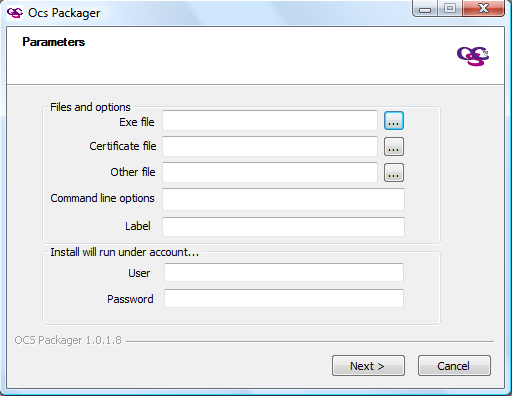
| + | A [http://prdownloads.sourceforge.net/ocsinventory/OCSNG_PACKAGER_1.01.zip?download packager] is available at ocs website. This will allow you to repackage ''ocsagent.exe'' with your own modifications (i.e. an SSL certificate!) | ||
| + | [[Image:OCS-packager.png]]<br> | ||
| + | ---- | ||
| + | 1st thing you need is to copy ''ocsagent.exe'' (modified or not) in '''''/opt/inventory/ocs/ocsreports/files/'''''. | ||
| + | |||
| + | Installer is locked (install.php), you need to change perms with the following command: | ||
| + | chmod 660 /opt/inventory/ocs/ocsreports/dbconfig.inc.php | ||
| + | |||
| + | Then, you can import this file in the database. Go to http://yourdomain.com/ocs/install.php | ||
| + | |||
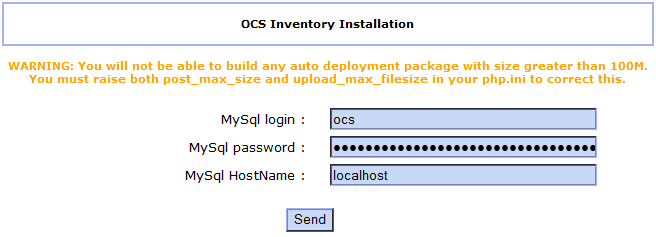
| + | Use the pre-configured account 'ocs' for that: | ||
| + | [[Image:OCS-installphp.png]]<br> | ||
| + | ---- | ||
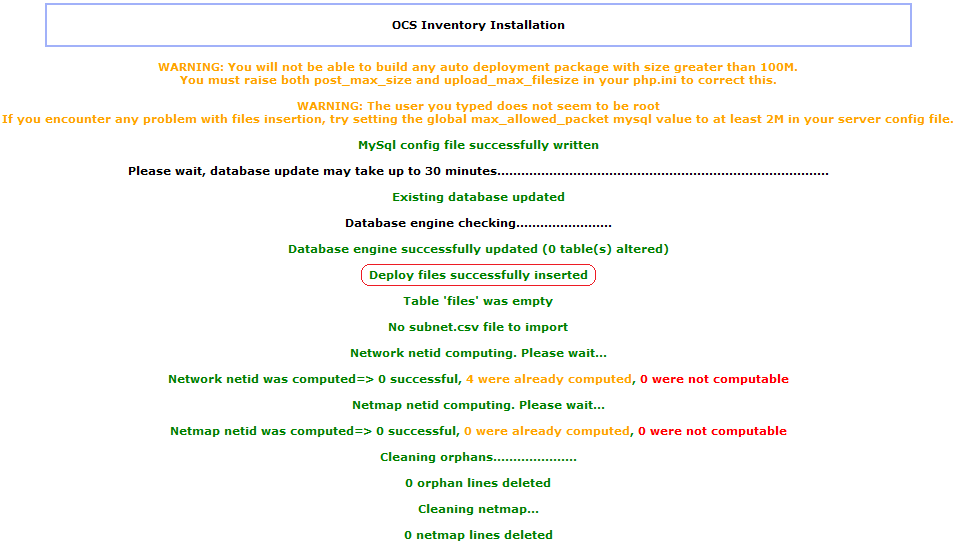
| + | If you get a warning message (cannot alter database), refresh the page and you should see a successful import. | ||
| + | [[Image:OCS-installphp-ocsagent.png]]<br> | ||
| + | ---- | ||
| + | ''ocsagent.exe'' is now in the database! | ||
| + | {{Warning box|install.php has reset ocs password to 'ocs'. Re-apply your changes with following command: | ||
| + | signal-event domain-modify | ||
| + | This will also reset chmod to 440 on ''dbconfig.inc.php'' | ||
| + | }} | ||
| + | You can now use ''OcsLogon.exe'' alone, it will download/update ''ocsagent.exe'' if needed! | ||
| + | |||
| + | If you want to remove ''ocsagent.exe'' from your database, simply delete the file from the server and redo install.php. This will delete the file from the database. | ||
| + | |||
| + | ==OCS Agent for Linux== | ||
| + | Download the generic linux tar.gz, unpack, read the README, and as root, run the setup script. | ||
| + | |||
| + | You may required additional perl- packages, use you package management tools to search for the missing dependencies based on the README or the error messages. See Section 4.2 in the internal OCS help file. | ||
| + | |||
| + | To run an inventory | ||
| + | ocsinventory-client.pl -server=server.net -tag=network3 | ||
| + | |||
| + | Check the time (will the PC be on) and command given in | ||
| + | /etc/cron.d/ocsinventory-client | ||
| + | |||
| + | |||
| + | |||
| + | |||
| + | |||
| + | |||
| + | |||
| + | |||
| + | |||
| + | |||
| + | |||
| + | |||
| + | |||
| + | |||
| + | |||
Revision as of 21:17, 27 November 2013
Maintainer
none
Install
yum install smeserver-ocsinventory --enablerepo=smedev,smetest,smecontribs -y
then
signal-event ocs-update
signal-event post-upgrade; signal-event reboot
after this you should go to http://YOURDOMAIN/ocs/install.php
just answer the questions, mysql database informations will already be there, you do not have to change them, as they were set.
then go to http://YOURDOMAIN/ocs/index.php
do not forget to change the default username and password which are admin /admin
also do not forget to do :
rm -f /usr/share/ocsinventory-reports/ocsreports/install.php
Special commands
To view OCS configuration, you can type the following at the prompt:
config show ocs
You can change a few parameters:
   DB parameter   |    Options   | Default | Explanation
# MaxUpload       | xM           | 100M    | Max uploadable file size
# InventoryAccess | local/global | global  | Accessibility of OCS Server (to receive inventories)
# InventoryDelay  | >1           | 600     | Time to wait (sec) to avoid server overload (Agent cron)
# URL             | new alias    |         | Optionnal aliases for ocs and glpi web interfaces
Client Installation
The client side is available on all platforms. Download the latest client version according to your OS.
After installing the Agent, you should launch it manually to upload your first inventory (as it's updated once per day by default)
While you are installing the agent, copy the cacert.pem file, see the SSL section below.
OCS Agent for SME Server
If you want to inventory other SME Servers (without installing the server-side and web interfaces)
yum install ocsinventory-agent ocsinventory-ipdiscover --enablerepo=smetest,epel
Then edit /etc/ocsinventory-agent/ocsinv.conf and modify following lines:
OCSSERVER=yourdomain.com
OCSTAG=your_tag
And finally launch the first inventory manually:
ocsinventory-agent -s yourdomain.com -t your_tag
OCS Agent for Windows
There are 2 differents ways of sending inventories on Windows. Download the latest client software, OCSNG_WIN32_AGENT_1.xx_repack.zip from ocs website. This archive contains 3 executables.
See Section 4.1 in the internal OCS help file.
Service use
Using OCS as a service is what you will probably need.
Launch the install of OcsAgentSetup.exe and provide default settings of the service.

Then launch the first inventory by typing the following in the 'execute box':
"C:\Program Files\OCS Inventory Agent\OCSInventory.exe" /server:yourdomain.com /np /debug /tag:your_tag
Wait a few seconds and go to http://your-server/ocs, you should see your computer's inventory.
By default, Agent will contact the Server once a day.
You can override this default behaviour in ocs web interface options. Your changes will be applied next time the Agent contacts the Server.
For troubleshooting, look at the log file in C:\Program Files\OCS Inventory Agent\COMPUTER_NAME.log
Standalone use
You can also make inventories on Windows without installing the service.
OCS standalone client is cut into 2 executables:
- ocsagent.exe - This file contains all needed files for the launcher
- OcsLogon.exe - This file is the standalone executable (launcher)
Of course, ocsagent.exe must be uncompressed before launching the standalone executable.
This can be done by executing directly ocsagent.exe: files will uncompress in c:\ocs-ng.
You can also import this file into ocs' MySQL database so that the standalone executable can download it if needed. This is documented in section MySQL importation.
The command line is the same as for the service:
"C:\Path_to_file\OcsLogon.exe" /server:yourdomain.com /np /debug /tag:your_tag
For easier and faster inventorying, you can also rename this standalone executable to your domain name (don't forget .exe):
"C:\Path_to_file\yourdomain.com.exe" /np /debug /tag:your_tag
For troubleshooting, look at the log file in C:\ocs-ng\COMPUTER_NAME.log
Importing ocsagent.exe in MySQL
The main advantage of this method is that you can send the standalone executable by Internet very quickly or even put the standalone executable on a floppy disk as it's only 65KB! How powerful looks your old floppy disk drive now?
This also allows to update files archived in ocsagent.exe on your clients (can be service or standalone executable).
A packager is available at ocs website. This will allow you to repackage ocsagent.exe with your own modifications (i.e. an SSL certificate!)

1st thing you need is to copy ocsagent.exe (modified or not) in /opt/inventory/ocs/ocsreports/files/.
Installer is locked (install.php), you need to change perms with the following command:
chmod 660 /opt/inventory/ocs/ocsreports/dbconfig.inc.php
Then, you can import this file in the database. Go to http://yourdomain.com/ocs/install.php
Use the pre-configured account 'ocs' for that:

If you get a warning message (cannot alter database), refresh the page and you should see a successful import.

ocsagent.exe is now in the database!
You can now use OcsLogon.exe alone, it will download/update ocsagent.exe if needed!
If you want to remove ocsagent.exe from your database, simply delete the file from the server and redo install.php. This will delete the file from the database.
OCS Agent for Linux
Download the generic linux tar.gz, unpack, read the README, and as root, run the setup script.
You may required additional perl- packages, use you package management tools to search for the missing dependencies based on the README or the error messages. See Section 4.2 in the internal OCS help file.
To run an inventory
ocsinventory-client.pl -server=server.net -tag=network3
Check the time (will the PC be on) and command given in
/etc/cron.d/ocsinventory-client